Microsoft Office 365 Message Center Notification

Thank You,

Aaron Gustafson

Managing Partner 

O: 254-735-0524

F: 254-296-8283

E: [email protected]

Computers N’ Stuff of Waco

B07307901


Now offering Alarm Monitoring for 32.99/Mo!


Call today to Talk about Fax to E-mail, Cameras, Alarm Monitoring, or Managed Computer Services!

Open Tickets by E-mailing [email protected]

Or visit Help.cnswaco.com

This
e-mail and any attachments are provided for the sole use of the intended recipient(s), and may contain information that is confidential, privileged, proprietary or otherwise protected by law. If you are not an intended recipient of this message, you are not
authorized to read, print, retain, copy or disseminate this message or any part of it. If you have received this e-mail in error, please notify the sender immediately by reply e-mail and destroy all copies of the original communication.


From: Microsoft 365 Message Center <[email protected]>

Sent: Saturday, December 5, 2020 12:38 AM

To: Aaron Gustafson <[email protected]>

Subject: Message Center Major Change Update Notification

 
Organization: COMPUTERS N’ STUFF
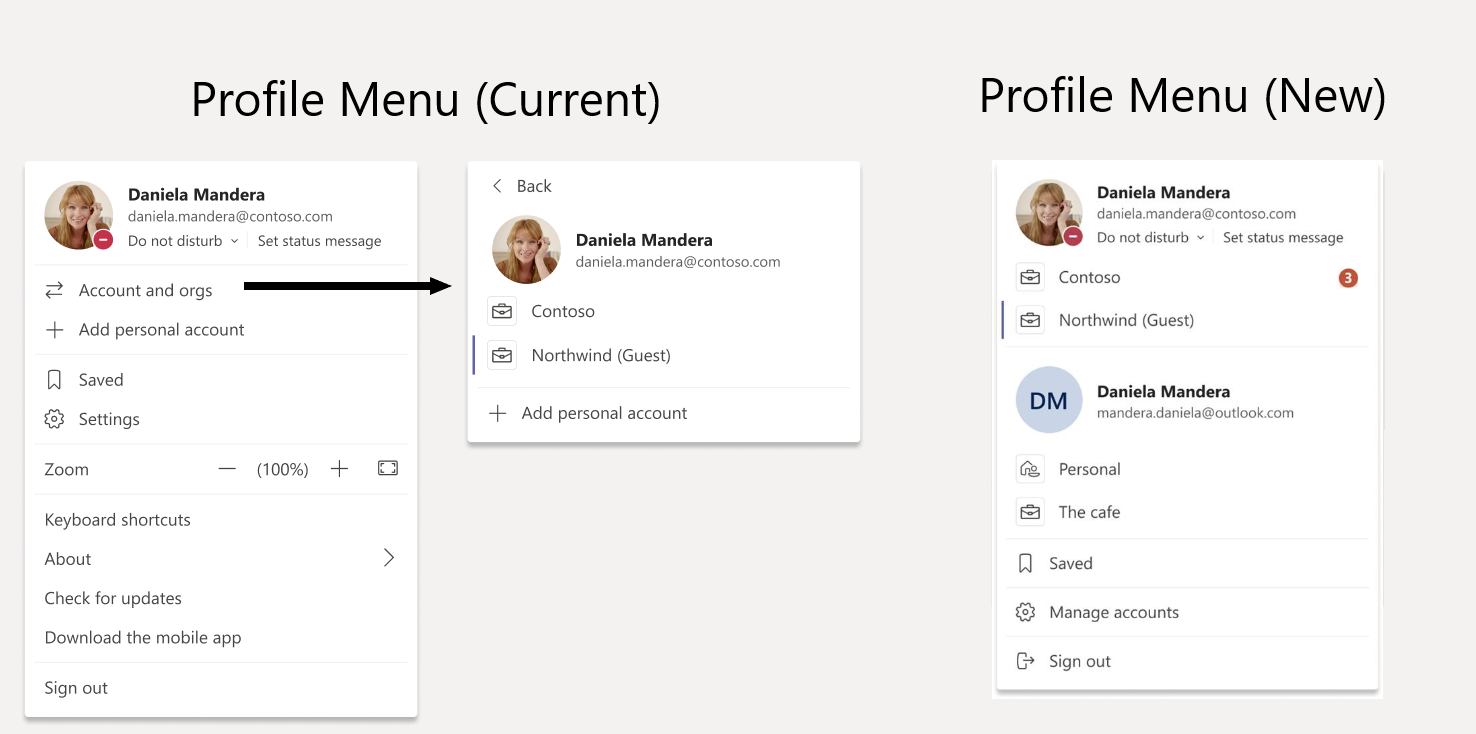
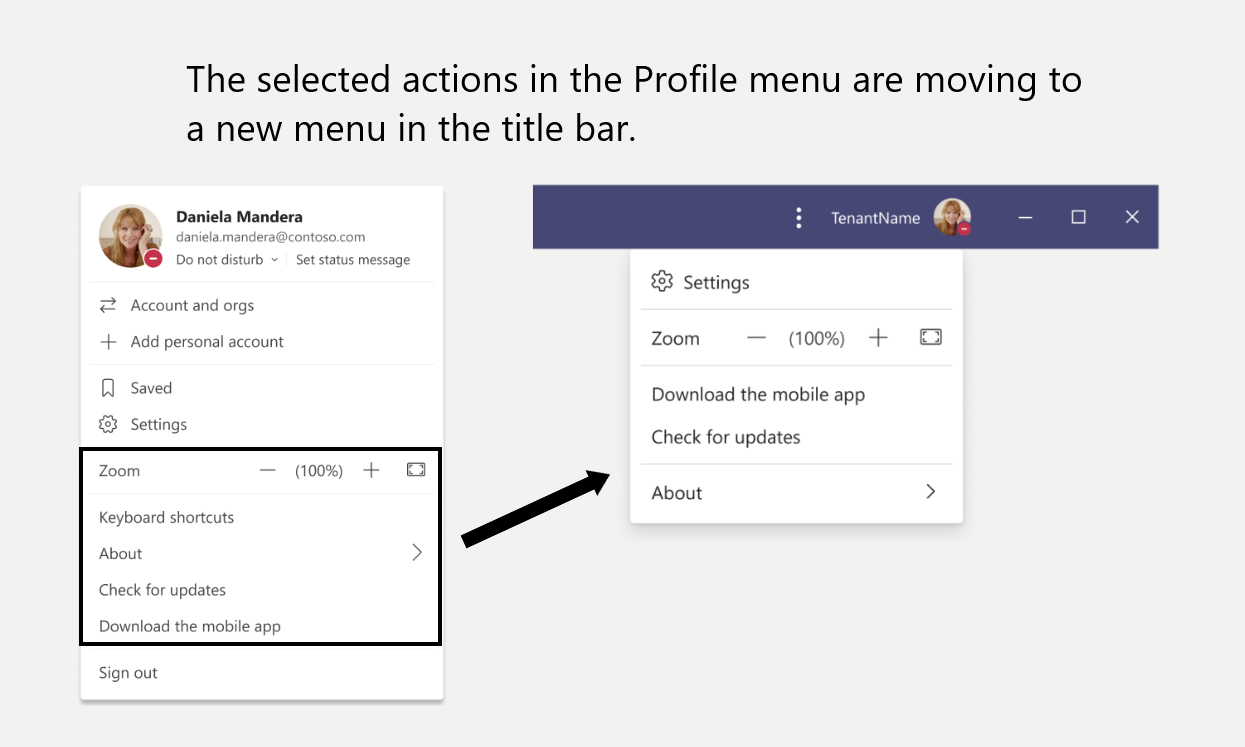
Microsoft Teams: Profile menu update, relocating profile menu links to a new menu in the title bar
MC228368
Major update: Announcement started
Applied To: All

Access to Settings, Zoom Controls, Keyboard Shortcuts, About, and Check for Updates is moving from the Me Menu to a new menu in the title bar. The Me Menu will be focused on account management, where users can switch to another account or tenant through
the first level of the Me Menu. The following links will be moved out of the Me Menu into a new menu in the title bar:

  • Zoom Controls
  • Keyboard Shortcuts
  • About
  • Check for updates

[Key Points:]

  • Timing: Rollout to standard release in late January and GCC in early February
  • Action: Review and assess

[How this will affect your organization:]

The Me Menu will be focused on account management, with account and tenant switching moved to level one of the menu. 

Settings, Zoom Controls, Keyboard Shortcuts, About, and Check for Updates is moving from the Me Menu to a new menu in the title bar. 

[What you need to do to prepare:] 

You may consider updating training and documentation as appropriate.

Sign
in to the Office 365 Admin center
to use the links below:
View
this message in the Office 365 message center
To customize what’s included in this email, who gets it, or to unsubscribe,
set your Message center preferences.

If you are receiving this email because your Admin added you as a recipient, please contact your Admin to unsubscribe.
Edit
release preferences

Choose the release track for your organization. Use these settings to join First Release if you haven’t already.

Microsoft respects your privacy. To learn more, please read our
Privacy Statement.
Microsoft Corporation
One Microsoft Way
Redmond, WA, USA 98052
Unsubscribe

Message Center Major Change Update Notification

From: Microsoft 365 Message Center <[email protected]>
Sent: Wednesday, November 11, 2020 10:03 PM
To: Aaron Gustafson <[email protected]>
Subject: Message Center Major Change Update Notification

logo_office365_large_corrected.png logo_MSFT_rgb_corrected.png
Organization: COMPUTERS N’ STUFF
Changing default folder provisioning language during Known Folder Moves
MC226548
Major update: Announcement started
Applied To: All
Known Folder Move must provision new folders on the service when the corresponding folders (Desktop, Documents, Pictures) do not exist. When creating these new folders, it has to pick a language in order to name these folders. With this change we will default to the Windows Display Language rather than use the OneDrive Site language. As a result, newly provisioned folders will be created and named in the Windows Display Language.

NOTE: this message is for IT admins managing the OneDrive sync app in a Windows Server enterprise environment that uses Active Directory Domain Services.

[Key Points]

  • Timing: December 10, 2020
  • Action: Review for awareness

[How this will affect your organization]

Any new Known Folder Moves that you are planning to do in a multi-lingual environment will use the Windows Display Language when provisioning new folders on the service. If you wish to avoid this you can pre-provision these folders on the service before Known Folder Move.

[What you need to do to prepare]

You may consider updating your training and documentation as appropriate.

Learn more: Redirect and move Windows known folders to OneDrive

Sign in to the Office 365 Admin center to use the links below:
View this message in the Office 365 message center
To customize what’s included in this email, who gets it, or to unsubscribe, set your Message center preferences.
If you are receiving this email because your Admin added you as a recipient, please contact your Admin to unsubscribe.
Edit release preferences
Choose the release track for your organization. Use these settings to join First Release if you haven’t already.
Microsoft respects your privacy. To learn more, please read our Privacy Statement.
Microsoft Corporation
One Microsoft Way
Redmond, WA, USA 98052
Unsubscribe

Import contacts to Office 365

If you use Microsoft’s subscription email client, Outlook 365, then importing contacts will need to be done via Outlook 2016, 2013, 2010 or 2007 (desktop or laptop client).

In Outlook desktop client, add your Outlook 365 account.

Just go to the file and then click on Add Account option and add your email account here. It could be your gmail account or any other email account. Just the add the account and click finish.

The two Outlooks should then sync and you will find your online emails and contacts accessible on the desktop client.

You will then need to import your new contacts to the synced account.

On the desktop client go to file at the top right side.


Go to Open & Export and choose Import/Export.


The Import/Export wizard will open asking how you wish to import. If you’re importing a CSV file, go to ‘Import from another program or file’.


Select ‘Comma Separated Values’ and then click next.


You will be asked to locate the CSV file on your computer, so make sure it is in an easy to locate place (such as desktop or downloads folder).


You will also be asked about importing duplicates, so check the option you prefer (the default is ‘allow duplicates to be created’).

Click Next and you will be asked where you want your contacts to be saved. Here you will need to make sure that you are selecting your Outlook 365 account.


Once you’ve selected the destination, click Next and then Finish.


Log in to your Outlook 365 account and your new contacts should be fully imported!

How to Static an IP Address

In this tutorial you will learn step by step how to assign static IP addresses and DNS server addresses on Windows 10.

To set up a static address you need to locate the Connection you are using.

windows-settings


1. Click on the Windows Icon Lower left.

2. Click the Settings icon

3. The windows setting screen appears click on the network and Internet link.

windows-settings-Inter

4. In the Network status pane locate the change adapter options link and click it

network-status-window

5. You should now see your network adapters. I have two installed and the Wi-Fi adapter is disabled. If your PC is equipped with two; as most are, then only use one and disable the other.

network-connections-window
6. Right click on the icon and select properties from the drop down list.

network-connection-properties

7. Use the scroll bar to locate TCP/IPv4 and click it to highlight it,and then click the properties button.

Local-connection-properties

If you are using DHCP then you should see a screen like the one below.standard-ip-address-settings
You can uncheck the automatic assignment of IP address and or DNS server address. Then enter your own details as show below:

static-ip-address-assignment

Notes:

1. My home network use the network address 192.168.1 (first three numbers) also common is 192.168.0 and 10.x.x.x

2. The default gateway is the address of your router. This is assigned to the router as a static IP address.

3. The subnet mask is important as is usually 255.255.255.0

4. You need the address of 1 DNS server to access websites on the Internet. The Google DNS server is available to use for free but you can use your ISP DNS servers.

5. You can choose to manually assign the DNS addresses and automatically assign the IP address or vice versa.

Why it’s important to secure your remote desktop connections

Created by XKLN, this website gives a useful non-technical explanation of why RDP is so dangerous and why it’s important that it never be opened directly on your router, and explains in a way, why CNS utilizes VPN’s for Remote Desktop connections to our customers Servers.


View the full site at https://rdp.exposed/

How to Move Your OneDrive Folder

Microsoft’s OneDrive cloud storage service is a huge convenience because it keeps your files synced across devices and backed up onto the internet. However, depending on how much you store in it, your OneDrive folder could take up many Gigabytes. If you have a second storage drive in your system or even another partition, you may want to move the OneDrive folder to free up space. Here’s how.

1. Right click the OneDrive taskbar icon and select Settings.

2. Click the Unlink OneDrive button under the Account tab. A login screen appears, but you should ignore it for now.

3. Launch File Explorer.

How to Reset A User Password in Active Directory?

Before resetting Active Directory user password, you need to log on domain controller with administrator rights, then follow these steps:

  1. Click Start, click Control Panel, double-click Administrative Tools, and then double-click Active Directory Users and Computers.
  2. Navigate to the Users item of your Active Directory domain in the left pane.
  3. Right-click the domain user account you want to reset the password for in the right pane, and select Reset Password.
  4. Type a new password into the Password and Confirm Password boxes.
  5. Click OK. Done!

Connect to a VPN in Windows 10

Connect to a VPN in Windows 10

Applies to: Windows 10


Whether it’s for work or personal use, you can connect to a virtual private network (VPN) on your Windows 10 PC. A VPN connection can help provide a more secure connection and access to your company’s network and the internet, for example, when you’re working from a coffee shop or similar public place.

Create a VPN profile


The location of the Add A VPN Connection button in Settings

Before you can connect to a VPN, you must have a VPN profile on your PC. You can either create a VPN profile on your own or set up a work account to get a VPN profile from your company.

Before you start:

  • Contact your IT for your VPN Credentials
  • If it’s for a VPN service you subscribe to for personal use, visit the Microsoft Store  to see if there’s an app for that service, then go to the VPN service’s website to see if the VPN connection settings to use are listed there.
  1. Select the Start  button, then select Settings  > Network & Internet  > VPN > Add a VPN connection.
  2. In Add a VPN connection, do the following:
    • For VPN provider, choose Windows (built-in).
    • In the Connection name box, enter a name you’ll recognize (for example, My Personal VPN). This is the VPN connection name you’ll look for when connecting.
    • In the Server name or address box, enter the address for the VPN server.
    • For VPN type, choose the type of VPN connection you want to create. You’ll need to know which kind of VPN connection your company or VPN service uses. (Auto works too)
    • For Type of sign-in info, choose the type of sign-in info (or credentials) to use. This might be a username and password, one-time password, certificate, or a smart card if you’re connecting to a VPN for work. Enter your username and password in the respective boxes (if required).
  3. Select Save.
  4. If you need to edit the VPN connection info or specify additional settings, such as proxy settings, choose the VPN connection and then select Advanced options.

Connect to a VPN


When you have a VPN profile, you’re ready to connect.

  1. On the far right of the taskbar, select the Network icon (either  or ).
  2. Select the VPN connection you want to use, then do either of the following depending on what happens when you select the VPN connection:
    • If the Connect button displays under the VPN connection, select Connect.
    • If the VPN section in Settings opens, select the VPN connection there, then select Connect.
  3. If you’re prompted, enter your username and password or other sign-in info.

When connected, the VPN connection name will display Connected underneath it. To see if you’re connected to the VPN while you’re doing things on your PC, select the Network icon (either  or ) on the far right of the taskbar, then see if the VPN connection says Connected.

Connected to a VPN